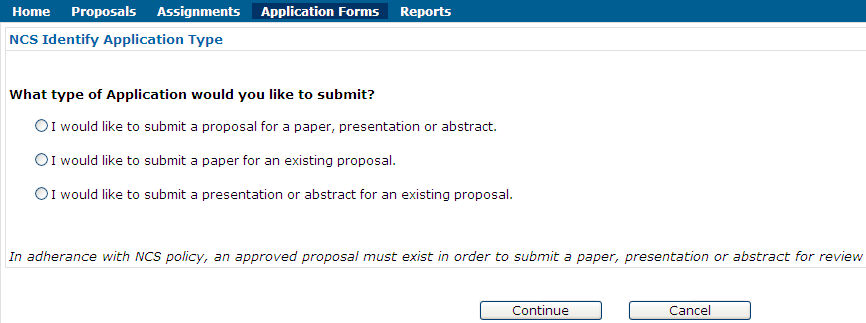
Choose Application Form. Depending on project, you may also have to select the type of form you wish to fill out. Forms are project-specific. The top line displays the form tabs; the bottom line displays action buttons.
Form samples

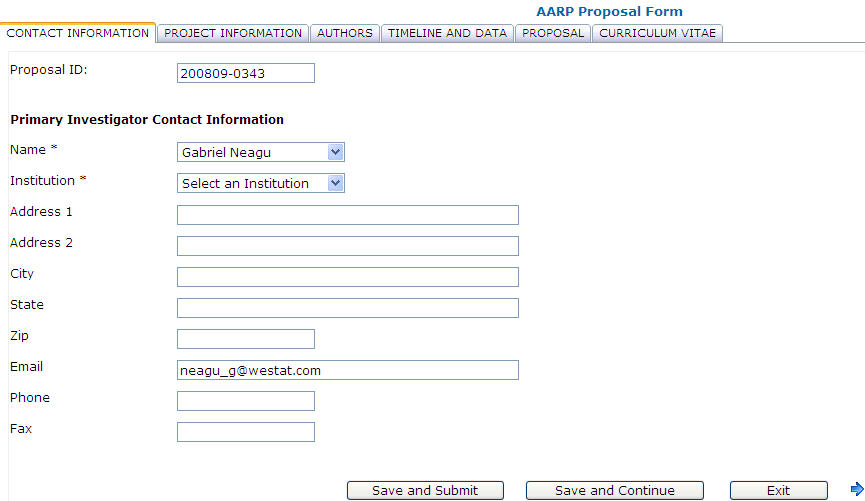
Click a tab to select it. The Proposal ID number is system-generated.
The buttons may include some or all of the following:
Save and Submit
Save and Continue
Cancel Application
Exit
At the bottom of the page there are also tab navigation
buttons: a left arrow ( )
and a right arrow (
)
and a right arrow ( ).
The left arrow is absent from the first page; the right arrow is absent
from the last page. You may navigate from tab to tab by clicking on the
tabs. You may also use the right arrow to advance to the next tab or the
left arrow to return to the previous tab.
).
The left arrow is absent from the first page; the right arrow is absent
from the last page. You may navigate from tab to tab by clicking on the
tabs. You may also use the right arrow to advance to the next tab or the
left arrow to return to the previous tab.
Fill in the required fields (marked by an asterisk *) and other fields as needed. Saved applications appear in your list of applications under the Proposals menu item.
Type information in most fields and select the appropriate value from the dropdown lists.
The add-author functionality depends on your project. The principle is the same throughout STaRS, but the details differ. If your project is NCS, follow these steps to add authors.
1. Click the Proposed Authorship tab.
2. Click the Name dropdown and select the author from the list.
3. Click Add Co-Author. The selected name will be added to the list of Co-Authors / Collaborators.

4. Repeat the process as many times as necessary.
If the desired name is not in the list,
1. In the Name dropdown choose Add New. The Add New form will appear.
2. In the Name field of the new form select Add New again.
3. Fill out the required fields: Name, Institution, and Email. Provide a telephone number if known (not required).

4. Click Add Co-Author. The new name will be added to the list of Co-Authors / Collaborators.

5. Repeat the process as many times as necessary.
The new names are added to the list of Co-Authors
/ Collaborators. If a name is added in error, click on the delete
symbol ( ). A prompt will ask for confirmation. Click
Cancel to keep the name; OK to delete it.
). A prompt will ask for confirmation. Click
Cancel to keep the name; OK to delete it.
If your project is not NCS, you might have to follow these steps:
1. Click the Authors tab.
2. Select the Type in the first box. Then type the Name and Institution (sometimes you may also have to add a valid e-mail address).
3. Click Insert Author.


The new author will be added on the first line
If your project is NCS you may not edit an author's information. If that is necessary, contact NCS Support Desk at 888-395-3932 or send e-mail to NCSSUPPORTDESK@Westat.com to update the information.
You will also have to contact NCS Support Desk if the list of available coauthor names must be supplemented.
If your project is not NCS, you may edit this information. Click Edit to modify a record. The entries become editable. Make corrections and click Cancel to lose the changes; Update to save them. On Update the changes are saved.

If a coauthor's name is added in error, click on the
delete symbol (). A prompt will ask for confirmation. Click
Cancel to keep the name; OK to delete it.
Click Delete to delete a record from the table.


Wherever date fields are provided, type the date in MM/DD/YYYY format or select a date from the calendar icon.

Click on a date to select and enter it. Click the right arrow to advance month. Click the left arrow to go one month back
Follow these steps to add date milestones to your proposal application.
1. Click Timeline and Data.

2. Enter dates in the MM/DD/YYYY format or, alternatively, click the appropriate calendar icon. A calendar will appear. Click on a date to select and enter it. Click the right arrow to advance month. Click the left arrow to go one month back.

3. Type the title of the proposed journal in the appropriate field.
4. Check one, two, or all boxes to
indicate the future source of your data
When you finish click Save and Submit. If you have skipped required fields, STaRS will display a prompt reminding you to fill out the required fields. Click OK to close the prompt and complete all the required fields. Then click Save and Submit. Your application will be submitted, and it will appear in the coordinator's Assignments list.
The status of a saved but not submitted application is Waiting for Application. The status of a submitted application is Pending Completeness Review.
The Attach File(s) utility is similar throughout the system.
The Attach File(s) field may be preceded by the Attached File(s) words or not, and it is followed by Browse and Upload File buttons.

1. Click Browse. The Choose File dialog box will appear.
2. Navigate to the file you wish to upload, select it to bring its name in the File name field.
3. Click Open. The file name and path will appear in the Attach File(s) field.

4. Click Upload File. The selected file will be displayed in a table below the Attach File(s) field.

5. The selected files have now been attached to the proposal page or form on which you were working.
If files have been attached in error, click Delete
() to delete the selected file from the list.